Accessible CSS/XHTML - 3 Column Website Layout
Introduction
This CSS tutorial outlines all you need as the framework for any fixed-width 3 column website. I provide the XHTML and CSS for the layout and will explain each section of the code throughout the tutorial. This article is aimed at the beginner web designer who wants to create an accessible website, learn about how it all works and why.
Feel free to download the files and use them to start building your own website. Please note this is intended as a starting place for your design and not a ready-template, you will need to add in your headings, images and other content.
- View the page live here: 3 Column Layout Example
- Download the files here: 3 Column Layout Code [.zip 1KB]
Contents
The Code:
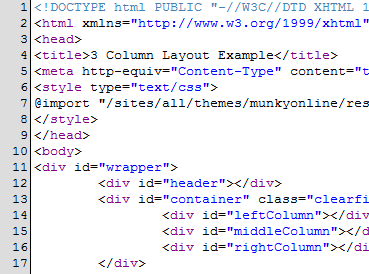
XHTML
<!DOCTYPE html PUBLIC "-//W3C//DTD XHTML 1.0 Strict//EN" "http://www.w3.org/TR/xhtml1/DTD/xhtml1-strict.dtd">
<html xmlns="http://www.w3.org/1999/xhtml" xml:lang="en-gb" lang="en-gb">
<head>
<title>3 Column Layout Example</title>
<meta http-equiv="Content-Type" content="text/html; charset=iso-8859-1" />
<style type="text/css" media="screen">
@import "/styles.css";
</style>
</head>
<body>
<div id="wrapper">
<div id="header"></div>
<div id="container" class="clearfix">
<div id="lefCol"></div>
<div id="midCol"></div>
<div id="rigCol"></div>
</div>
<div id="footer"></div>
</div>
</body>
</html>
Styles.css
#wrapper { width:960px; margin:0 auto; padding:1em; background-color:red; }
#header { padding:1em; background-color:blue; }
#container { padding:1em; background-color:green; }
#lefCol { float:left; width:165px; padding:1em; background-color:orange; }
#midCol { float:left; width:500px; padding:1em; background-color:yellow; }
#rigCol { float:left; width:165px; padding:1em; background-color:purple; }
#footer { clear:both; padding:1em; background-color:black; }
.clearfix:after { visibility: hidden; display: block; font-size: 0; content: " "; clear: both; height: 0; } /* slightly enhanced, universal clearfix hack */
.clearfix { display: inline-block; }
/* start commented backslash hack \*/ * html .clearfix { height: 1%; }
.clearfix { display: block; } /* close commented backslash hack */
The XHTML/CSS Code Explained
Doctype (Document Type Declaration)
<!DOCTYPE html PUBLIC "-//W3C//DTD XHTML 1.0 Strict//EN" "http://www.w3.org/TR/xhtml1/DTD/xhtml1-strict.dtd">
The Document Type Declaration tells the web browsers what W3C specification the page is using, and this defines what (X)HTML elements and attributes can be used in the code. There are numerous Doctypes which you can choose from but the most accessible is XHTML Strict due to its more refined specification and cross-browser friendliness. By adding a Doctype you are also able to test the markup of your pages in the W3C HTML Validator.
If you don't specify a Doctype then a visitors browser will view the page in 'quirks mode' which could cause large differences in how the page is rendered from browser to browser.
Note that every tag and attribute is written in lower case when using an XHTML Doctype. The attribute values can still use upper case characters if you wish.
More info on Doctypes:
Page Structure
HTML Element
<html xmlns="http://www.w3.org/1999/xhtml" xml:lang="en-gb" lang="en-gb">
In every (X)HTML document there are HTML elements. As with all HTML elements there is an opening tag <html> (right at the start of the document) and a closing tag </html> (right at the end of the document).
This HTML element also has three attributes - xmlns, xml:lang and lang. Because XHTML is a mixture of XML and HTML, the element and attribute names need to be defined as they differ from standard HTML. This is achieved through the XML Namespace attribute (xmlns) and in this example the schema is set to http://www.w3.org/1999/xhtml.
Next the language setting for the XML is set through the attribute xml:lang and the HTML language is set using the lang attribute. If you leave any of these blank then you are declaring that you don't want to associate the document with any specific language.
Head Element
<head>
The Head element goes at the top of the (X)HTML document and contains information about the document e.g. the page title, meta keywords and meta description (which may be useful to search engines) and references to the locations of the scripts and styles.
Meta Content
<meta http-equiv="Content-Type" content="text/html; charset=iso-8859-1" />
The head element should also contain declarations for the character set and encodings used in the document through a meta tag. If you dont want to include this tag then it also can be set using an .htaccess file. More information about character sets & encodings.
Body Element
<body>
All the visual parts of a website that you see in a web browser are contained within the Body Element. Your main page layout and any page contents here must be structured using semantic (X)HTML markup. Standard HTML includes body presentational attributes but in XHTML these are achieved through CSS, in the endeavour to keep markup and styling code separate.
Block Level & Inline Elements
Various (X)HTML 4 elements are block level elements and this means that they are used as containers for other block or inline elements and usually are visually rendered on a new line. The most ideal block level element to use for your page layout is the <div> and is typically used to create the larger regions of a page layout.
In our layout we have used the following block level structure:
<div id="wrapper">
<div id="header"></div>
<div id="container" class="clearfix">
<div id="lefCol"></div>
<div id="midCol"></div>
<div id="rigCol"></div>
</div>
<div id="footer"></div>
</div>
Our page consists of:
- A div with the id attribute of wrapper which contains the whole layout and will be used to control the page position and width.
- A div with the id attribute of container to contain our three columns.
- A div with the id attribute of lefCol which will form the left column.
- A div with the id attribute of midCol which will form the middle column.
- A div with the id attribute of rigCol which will form the right column.
- And last of all a div with the id attribute of footer which will contain the content for the bottom of the page and will stretch across the bottom of the columns to the full width of the page.
HTML elements have identifiers of id and class attributes so that specific regions of the code can be targeted and controlled by a script or stylesheet.
CSS (Cascading Style Sheets)
Our Layout CSS
The creativity of a website comes into play through the Cascading Style Sheet. CSS is used to control the visual side of the elements - height, width, colour, background image etc. To target a specific element you define the id or class that you have assigned to it in the HTML, so for example, the wrapper div element is targeted using #wrapper. "#" is equal to the id attribute. A "." before a name in the CSS refers to a class attribute.
#wrapper { width:960px; margin:0 auto; padding:1em; background-color:red; }
The wrapper has a fixed width of 960px (pixels), this is the size of the viewable screen when most common web browsers are 'maximised' in 1024x768 screen resolution. 1024x768 is currently the most widely used resolution although new TFT screens are able to support much higher resolutions. We have also centred the wrapper, and therefore centred the whole page in the browser by using margin:0 auto;. This means that the top and bottom of the wrapper have no margin and the left and right margins automatically adjust to be an equal distance from the screen edge, pushing the page into the middle of the screen.
#header { padding:1em; background-color:blue; }
#container { padding:1em; background-color:green; }
The header and container are both contained within the wrapper div. The header will form the top section of the website, where you could for example, place a logo and a search box. This header has been coloured blue in our example page. The container (coloured green) is used to contain our three columns. As there is no actual content yet within our div's, I have added padding (spacing from the inner-edges) to them so you can see their background colours, making it easier for you to see the structure of the layout. Margins work from the outside-edge of an element, so if you set a margin then you'll be creating a space around the element.
Margins & Paddings
Margin & Padding Diagram.

When writing the CSS for margins and paddings you can write it in a number of ways. margin:1em; will place a 1em margin on all sides. You can define a padding or margin for a side individually using margin then a hyphen and the side, so for example, margin-left:1em; would put a 1em margin on the left side of the element.
To use less code you can define all four sides using just margin, then the four values for each of the sides. For example margin:1em 2em 1em 2em;. The order of the values is Top, Right, Bottom and Left. Notice how in that example we've given the same values to the top and bottom, and then the same for the left and right margins? If you want these to be the same then you can shorten the CSS further to margin: 1em 2em;, the first value will apply to the top and bottom edges and the second value will apply to the left and right.
One thing you also need to remember is that when you add padding to an element you are adding to the width of the element. So say for example you had an element that was 100px wide and you had a padding of 10px, this will give the element a left and right padding of 10px. This would give a total of 20px padding affecting the width of the element. If you added 20px padding to a 100px wide element you will actually make the element 120px wide. So if you want to keep the box to 100px wide you need to subtract the padding from the width, giving you a value of 80px for the width and 10px padding to produce a 100px wide element.
Floats and Clearfix Hack
#lefCol { float:left; width:165px; padding:1em; background-color:orange; }
#midCol { float:left; width:500px; padding:1em; background-color:yellow; }
#rigCol { float:left; width:165px; padding:1em; background-color:purple; }
To create the three vertical columns (lefCol, midCol & rigCol) we need to apply float:left; to each of the divs. This will make them 'float' to the left edge of their container, which is the container div. When there are multiple floating divs, each div will float to the right side of the floating div preceding it. So as we have floated all of our divs to the left, they will all align next to each other from the left edge of #container, providing they don't extend beyond the width of #container. Otherwise a column may fall below the other columns rather than be along side them. You need to make sure the widths of the columns do not add up to more than 960px which is our defined page width. Our columns widths add up to 830px, remember to take into account the padding too, as I mentioned earlier, it will expand the width of the element.
#footer { clear:both; padding:1em; background-color:black; }
Now we want our footer to stretch along the bottom of our columns and to move with them, when the columns increase in size if more content is added. This is achieved with the clear:both;, which forces the element to fall below both left and right floating elements.
<div id="container" class="clearfix">
There is a bug in Mozilla browsers which requires us to use what is known as a Clearfix hack. Now this is caused because Mozilla browsers have an issue with floating elements and their container's height. When there are only floating elements within our #container div it cant resolve the height of the floating divs and so doesn't stretch to fit them. By applying the clearfix class the #container will expand to the height of it's floating divs.
.clearfix:after { visibility: hidden; display: block; font-size: 0; content: " "; clear: both; height: 0; } /* slightly enhanced, universal clearfix hack */
.clearfix { display: inline-block; }
/* start commented backslash hack \*/ * html .clearfix { height: 1%; }
.clearfix { display: block; } /* close commented backslash hack */
This works by using the CSS to place a non-floating space after the floating divs (content: " ";) and so the browser will then stretch the #container div to wrap around this new space. You can test this by taking out the class="clearfix" and you will see that the green colour is no longer behind our columns when viewed in a Mozilla browser, e.g. Firefox.
More info on Floats & Clearfix Hack:
Linking in your styles
<style type="text/css" media="screen">
@import "/styles.css";
</style>
The best practice for linking in your styles is to put them all in an external style sheet and then link them using the @import rule. Notice that the import is defined within the style element which goes in the Head element. The style element has the attributes of type and media. Type lets the browser know that the style information is CSS with type="text/css". Media defines the target device for the styles, in our case we have used media="screen" as it has been designed to be viewed on a computer screen. There are more media values to choose from, such as styles for handheld devices using media="handheld".
Conditional Comments
You're probably aware of the fact that Internet Explorer is notoriously bad at rendering pages and often doesn't display sections the same as the more standard compliant browsers. Well there is a handy way around it by using conditional comments that are only recognised by Internet Explorer, enabling you to deliver them their own stylesheets. We haven't had to use them in this layout but you may need to use them when you add in your own styles to customise the page.
<!--[if IE 6]>
<style type="text/css" media="screen">
@import "/ie6.css";
</style>
<![endif]-->
In the example above notice the <!--[if IE 6]>. This is a conditional comment that is specifically targeting Internet Explorer version 6, so these styles will only affect those with the IE6 web browser. You can include multiple conditional comments to target different versions individually. Try viewing the source code of this article page and you will see that we have a stylesheet for all IE browsers and one just for IE6.
Checking Your Page is Valid & Accessible
When you have added your content (X)HTML you have a great many online tools at your disposal to check if you have used valid code based on your chosen doctype and if your pages pass accessibility requirements.
Validate your CSS & XHTML
The W3C (World Wide Web Consortium) has tools for checking that you have used valid (X)HTML and CSS:
Check Your Page for Accessibility Issues
Guidelines for accessibility can be found on the W3C's Web Accessibility Initiative (WAI) website. It is now compulsory that websites that offer products or services to the public need to meet accessibility requirements. These tools do not check for full compliancy, you will need to make sure your websites meet the requirements.
Check for Section 508 & WCAG compliancy issues:
Useful Tools & Browser Extensions
Mozilla Firefox is what we consider to be the best web browser as it has lots of add-ons and toolbars that can be very useful for web designers. Here are a few tools that may be useful for you:
- Web Developer Add-on for Firefox. Essential set of tools for viewing source code, CSS and many other time-saving features.
- HTML Tidy Add-on for Firefox. Check your pages for valid code straight from the web browser.
- Firebug Add-on for Firefox. Developer debugging tool, use it to edit live pages through the browser.
- WAVE Toolbar for Firefox. Check for accessibility issues straight from the toolbar.
Updated: 08/04/09
- View the page live here: 3 Column Layout Example
- Download the files here: 3 Column Layout Code [.zip 1KB]